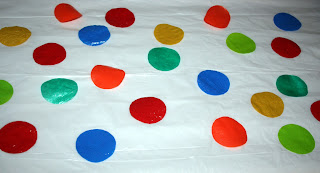
I came across the method of making fused plastic years ago. I did make up some fabric and sew a few bags. Of course, it was before I was good about taking pictures of the bags I made. I made a Messenger Bag with Target bags, a Home Depot lunch bag and a flowery shopping bag. They were all a little different, as all the plastic shopping bags you are using are different thickness/weight. You can tell the difference by how your fabric turns out.
I use to work at Home Depot in the returns department. So we always had tons of bags that were returned to be recycled. These ones ended up becoming a lunch bag.
If you do any bags with printing on it, it will come off when you fuse it. So I made sure to place the clear plastic on it before fusing.

This one I thought I needed flowers on. I didn't
need to cover the flowers with clear plastic theycame out fine and just fused to the other plastic bags.
Start by getting an idea of how you want the fabric to look. If you want it to be just plain bags fused together, or some type of pattern. If you want a pattern I would cut out the shapes before first.
To make fused plastic you need an iron, ironing board, parchment paper, scissors and bags.
It is best to have good ventilation, as you are melting the plastic. Crack a window open if you can.
I like to use 6 to 8 layers of bags if I using the fabric that needs a good structure. But of course it depends on the bags thickness - thinner, flimsy bags work best.
Place parchment paper unto your ironing board. Make sure to cover the whole area you are working on. Cut of the bottom end of the bag and then the top handle part. You can leave the bag side together and count that at 2 layers or cut one side and open it up to a larger 1 layer. You need to cut off the end so there will not be air caught between the bags that end up as bubbles. If there is writing on the bags turn them to the inside as the ink will run when heated up. If you wish to use the logo in the design, cover with clear plastic. Keep putting the layers together until you have 6 to 8 layers.
Once you get all the layers together, place parchment paper on top of it. I use an iron on Rayon setting but you might need to experiment with the setting. Start in the center of the piece and press down and lift, then reposition then press again, working across the plastic from centre out (no definite time, it depends on the iron, the plastic, etc.). You can peek under parchment to see if it is working. Once you have done the one side you will need flip it over to press the other side as well. I find the plastic is ready when it looks like it is sticking to the parchment paper.
You are best to work with smaller pieces of plastic fabric, as large areas are hard to handle and fuse evenly - no more than about 14 inches per side which is about the width of your ironing board. Make sure to make extra fabric as you go, as sometimes just when you think you are done you melt it a little too much and it will put holes in it. It is plastic so the piece you started with will shrink (and the amount is quite variable, up to about 15%) so it might end up too small for your pattern piece.
Once you get the hang of it, certainly try to do larger pieces. However, I find it easier to work with small pieces especially when returning to making plastic fabric after not doing it for a while.
This is so much fun to try and if you get on a roll you can use up a lot of plastic bags. They are very strong and can be washed and hung to dry. The flower bag I made back in 2008, and I still use it today.
So have fun with it.
Next up, how to work with plastic fabric.


5 comments:
This is so interesting.. I'll have to give it a try..
It is fun, I hadn't tried it in so long. Now I want to make up some other fabric, it works so well for bags.
What did you cut the circles out of? Plastic bags or paper? I have been wanted to try this. :)
Hi Susan. I placed four layers of plastic together and fused them together. Once they were fused I traced out my circles cut them out. I when ahead and placed them on the other plastic that I was going to fuse together. If you have a bright colour heavier plastic you can just cut the circles from one layer of plastic and skip the step of fusing four layers together.
I didn't place clear plastic over the top of the dots on this purse, but I should have after using the purse for awhile some of the dots have fallen off.
Does this make since, if you have any questions just let me know.
What type of clear plastic did you use. This is a great idea and I can't wait to try it.
Post a Comment