Tuesday, 25 April 2017

    Hi.  I'm Natalie's husband and I'm guest posting for Natalie, as she's knee deep in material at the moment.

    Natalie wanted a Chrysler PT Cruiser from the day that the first concept car images were released.  She had it as the background on her computer for years. She bothered bugged badgered convinced me that a PT Cruiser would be the ideal replacement for her ailing but beloved Sherman (blue Nissan pickup).  Like any intelligent husband, I crumbled under pressure and agreed.

    We ordered ourselves a PT Cruiser, silver, manual shift in May 2000.  No arguing over pricing, MSRP was the rule from the get go.  It arrived in October 2000, so fresh off the assembly line, the cargo bin under the passenger seat wasn't available (we never did get it).  Over the years, Natalie collected PT Cruiser stuff.  Coke cans with a PT Cruiser on it.  A PT Cruiser Hot Wheels car, silver. A superb die-cast model of a silver PT Cruiser.  A pink fairy pig that hung from the rear view mirror.
    Did we say that it snowed today ?
     Natalie loved her PT Cruiser.  It bought both our sons home from the hospital, as my car only had 2 doors. The first time we had my in-laws in the car, we took it through the car wash with them, and laughed when my mother-in-law accidentally opened a rear window.  For 14 years, that car had been part of our family.

    This year however, marked the end of that relationship. As a 14 year old model of a car with limited desirability, a quarter of a million on it, and manual shift, we knew we wouldn't get much selling it and no dealer wanted it as a trade.  We wanted more than just to drive it to a wreckers.   We decided to do something special with the car. 


    Fourteen years is a long time in car years.  We considered my nephew who just turned 16, but as we have to stay on speaking terms with my sister, we had to rule that out.  We tried to donate the car to the automotive program at my nephew's high school, but that didn't pan out either.  Then we saw the Kidney Foundation of Canada advertisement in this month's CAA magazine.

    The Kidney Foundation has a program where you can donate a car, truck, or even a boat. You get a tax receipt for a minimum of $300 (depending on the ultimate value of your donation) and proceeds from the Kidney Car funds medical research and patient services for those living with kidney disease. Although we've been fortunate enough not to have a family member with kidney disease, this solution felt right.  It felt very right.

    As it turns out, this world is a small one.  We learned just after making arrangements to have the car picked up by the Kidney Car folks, that a friend of Natalie's has a relative that has just received word that a kidney is available.  You can't imagine how powerful this felt.
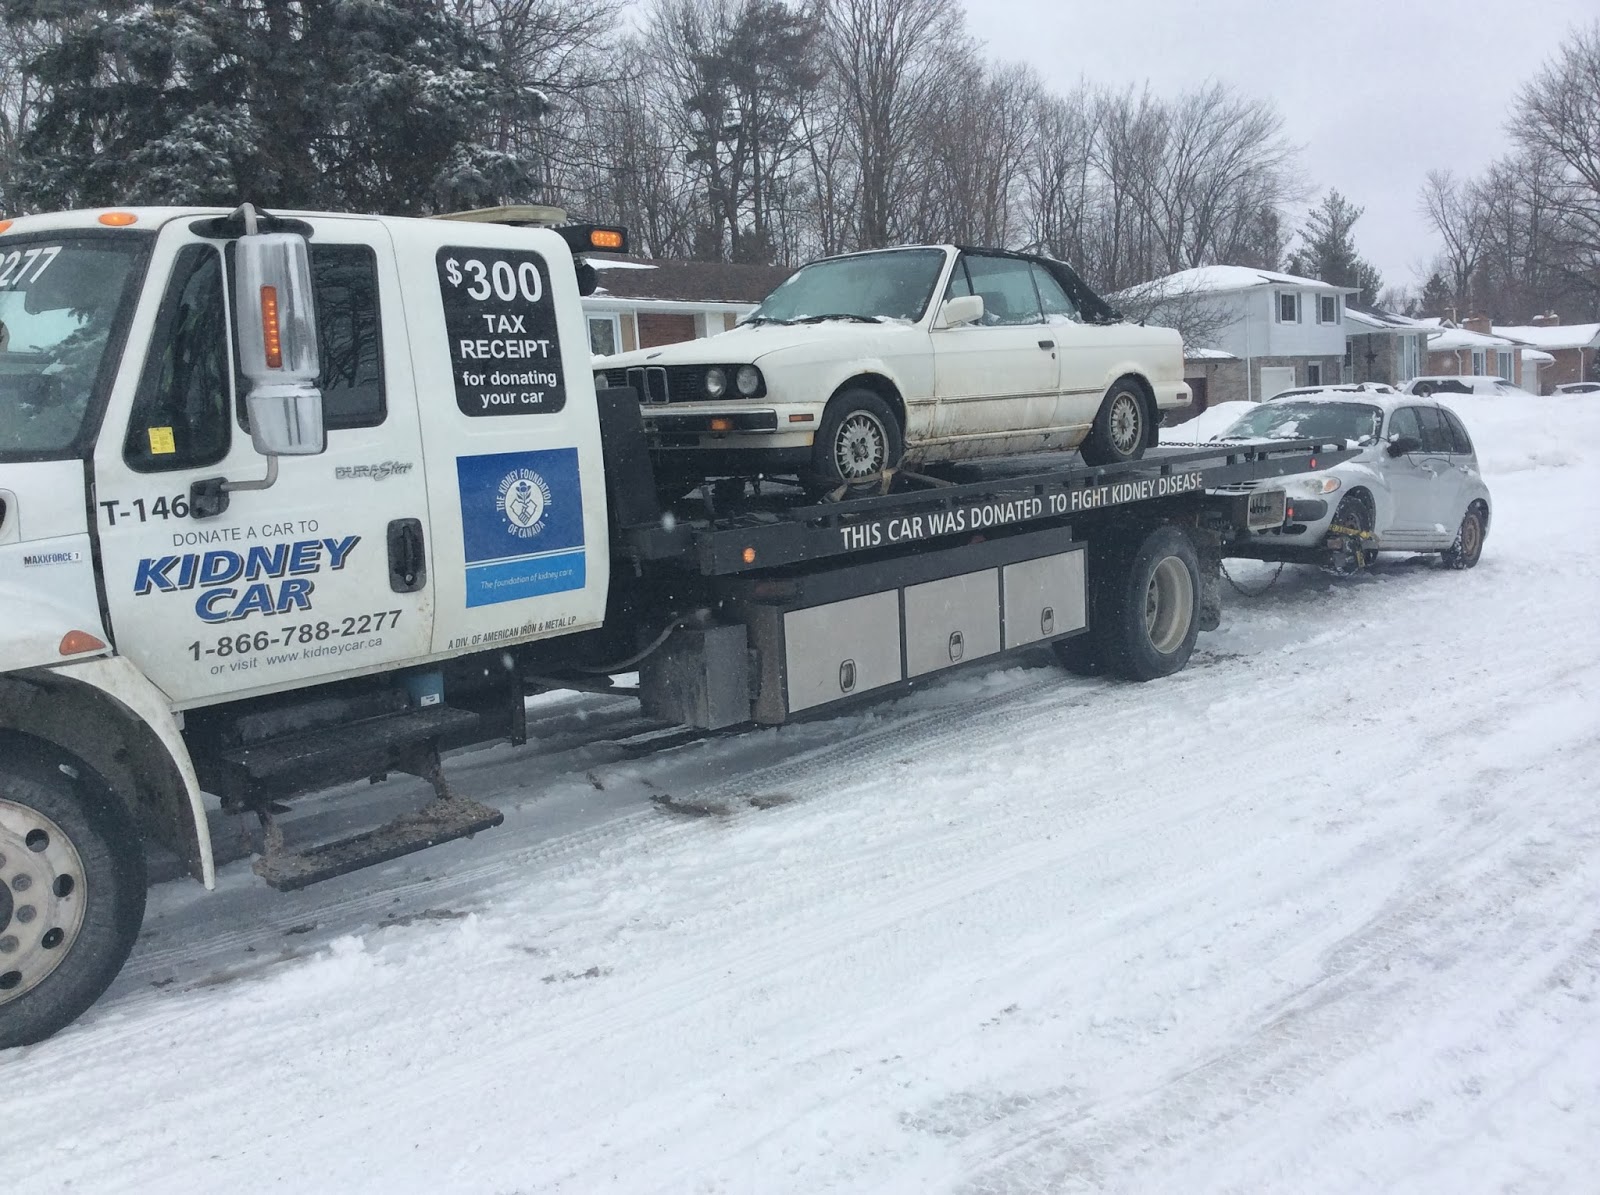
    The driver who picked our car was wonderful !
    So we watched the Kidney Car tow truck arrive in the snow this morning.  The cheery driver, who had already picked up a Volkswagen Cabriolet earlier today, handled the paperwork and hooked up our car.
    As we watched the car get taken away, we were pleased to hear that the transplant surgery went well, with the expectation of kidney function within the week.

    Karma ?  Carma ?  Seriously, you just can't make up stuff like this.
    Link to the Kidney Car Program


    Bye Car !

    BTW, did you notice that the first picture was of the model, not the actual car ?


Thursday, 28 May 2015

The Better-Than-Basic Bag Patten Testing

I was happy to be able to Pattern Test for Jodi of Sew Fearless. She has just released a new Pattern called The Better-Than-Basic Bag.


This pattern is very well written, the instructions are clear, and the pictures will help you if you need any further clarification.  Jodi has added instructions on matching interfacing and interlinings to fabric.  This is a great idea to add at the front of the pattern it gives you a chance to decide how firm you wish your bag to be before you go shopping for your leather and fabric. If you haven't worked with leather she explains about choosing your leather.


I love this bag, it has a leather  lower body and handles. With a centre zippered pocket that is fixed to the lining of the bag, at the side seams.  I like the way the pocket was designed, as it helps to keep your bag organized.  As well as a secure place to find your wallet and keys. I can see this being a great bag to use for a day of shopping, or a trip to the gym. In case you're like me you don't go to the gym, your knitting will fit in nicely.


I had no problems with sewing this bag from the pattern. I'm very happy with the way it turned out the size is good.  I will have to make some more of these in the future. If you haven't sew with leather before this is a perfect pattern for you to start with.

Wednesday, 1 April 2015

The Manhattan Bag Pattern Testing


I was lucky enough to get a chance to Pattern Test The Manhattan Bag  for Emmaline Bags 

Janelle has released a new pattern as part of the Bag of  the Month


I Love this pattern, I had so much fun making it. Janelle has come up with another great pattern.  The Manhattan comes in two different sizes the Mamma and the Miss. It has the coolest zippered pouch in the flap.  A great place to put your sunglasses, and it has the pattern for you to make your own glasses case.  Janelle designed it so you can attach the glasses case into the flap, making for an easy way to store you glasses.


I found this pattern to be very well written with lots of pictures to go with the written instruction.  I always like the fact that when you print out her pattern pieces, she has the 1" block so you can measure it to ensure that you have print the pattern to scale.  I didn't have and problems following the pattern and everything lined up beautiful even the magnetic snaps on the front of the bag.


The Mamma is big enough to hold my iPad and wallet, where as the Mini holds my wallet and anything else I think I need.
 
 I will be making more of these bags in the future. These ones are already spoken for, the Bird Mamma will be heading to my Mom for Mother's day.  The Miss will be heading to my Sister, Jennifer.


 I decided to use Black Denim for this bag, it is from Ikea ,and use to be a couch cover.  I need some cream fabric to go with the feed sack so I had to tea dye checked tea towels, as all I had was white ones.  I love trying different things with fabric, it worked  out as a  perfect match.   I used a flour sack on this bag, it is from the S. J. Bellamy Flour Mill at Upper Canada Village.  My Great, Great, Great Uncle S. J. Bellamy Built and owned the Mill before it was moved to Upper Canada Village.  So since my maiden name is Bellamy I thought my sister would love it. 


Wednesday, 7 January 2015

Bonnie Bucket Bag by Swoon

Since I finished sewing all my Christmas Presents (yes I was still sewing on Christmas Day) making some lovelies for other people. I needed to get back into my sewing room and clean up.

I came across my Bonnie Bucket Bag by Swoon Sewing Patterns that I hadn't had a chance to finish last year.  I needed a new purse so I thought I would finish it for me.


If you haven't tried any of Swoon Sewing Patterns you should give them a try.  Alicia has a lot of different types of bags, purses, and totes.

The patterns are well written and come in PDF's or as a printed pattern.  I love using PDF's from Swoon as I can leave the directions on my computer and just print out the pages that have the pattern pieces on them. 


On the Bonnie it called for a zipper to close the bag, but for me I usually don't zip it half the time.  So I used a magnetic snap for the closure. The pattern also called for a welt pocket on the outside, I didn't really have a need for the pocket on the outside so I didn't add that to the bag.  I did add a zippered pocket on the inside lining to carry my phone in.   I took the time to add a second line of top stitching on the front band and added top stitching to the side seams. To add a little more structure to the bottom of the bag in the lining and outer bag I top stitched down the seam to the bottom of the bag.  It gave it the more structure I was looking for and also gave it a more professional finish.


Of course since I like to add some my "Bling" to my bags I tried a new-to-me piece of hardware from Emmaline Bags. Janelle is always coming up with something new to add to my collection. Handmade with pride.


Sunday, 5 October 2014

Flowers in the Summer.

I have had a fun summer of taking pictures.  I spent lots of time outside in the garden watching bees, birds and butterflies. I end up spending more time outside in my garden then I did sewing.  Fall is when I get back to sewing.


I have peonies, lilies, hostas as well as a lot of other perennials.  My garden is mainly perennials with some annuals tucked in for colour.


It has been a hard Summer on the Garden as I need to mulch it as it was dry from lack of rain. I will be getting a couple of yards of mulch delivered soon so I can mulch the gardens.  I will wait as long as I can as the squirrels will remove it all while they are hiding their nuts for the winter.


The bees even liked the freaks in my garden. This cone flower fused two stems together so this is    how the flower turned out. 


So happy to have the Monarchs return this Summer.  I have been waiting to see them for along time. I even have milkweed in my Garden to help them out.  The other fun one I saw in my garden is the Hummingbird Moth at first when I heard it I thought it was a Hummingbird.


So these are a few of all the pictures I took this Garden season, now I have to spend sometime trying to pick 12 of my favourite pictures to use for my 2015 Calendar.

Thursday, 3 July 2014

The Totes Ma Tote Pattern Testing

I love pattern testing, I was able to test for Janelle of Emmaline Bags , her new pattern Totes Ma Tote. I have done pattern testing for a few of her bags. I always find it fun to do and of course there is always a chance to use some new hardware. The size of the tote is W 17" at the top of the tote, W 13" at the bottom, H 12", D 4". I have no problem fitting in my iPad, wallet, water. I'm sure that I could fit in a small lap top, if need be. I like that it is a recessed zipper on this tote, as it doesn't take away the look of the bag.


This pattern is fun and different, due to the fact that you are adding oval grommets to place the straps in. That means you get to play with hardware and purse jewelry......eyelets, buckles, purse feet, magnetic snaps and my all time favourite Handcrafted in Canada. There is no shortage of bling.

I had no problems following the instructions for this tote as Janelle has clear written instructions as well as great pictures. I also got a chance to try a new product for me Annie’s Soft & Stable. Such a great product to use in the bag, I love how this adds so much body to the bag.


There are enough pockets inside for all your needs, to place your phone as well as any other things you wish to place in them so that everything is easy to find when needed. I find that the zippered pocket is a good size that I can even zip my wallet into it.

I used quilting cotton and then vinyl for my bag. I was able to follow the pattern to the use the vinyl except till I got to the straps when you needed to add the buckles to it. I ended up making the buckle straps by cutting 1/2" on the width of them and folding them to meet each other in the centre of the straps and stitched on either side of the centre. Due to the fact that it was vinyl that I was using, the ends of the vinyl show white so I needed to use a permanent orange maker to paint the ends.


I did make the handles the length that the pattern called for, then after taking all the pictures of the bag and using it for a couple of days, I decided to make longer handles. The only thing I would add next time I make the bag is a key strap to attach my keys too, it could be easy added to one of the pockets.

I had so much fun with this bag as I decided that my zombies needed to be Quilted around so I went nuts and quilted pretty much all the drawing on the fabric.

I can see myself making up a few more of these bags in the future, I think it would look great in leather.

This is the tote after I added the long straps.


My crazy quilting.

Sunday, 4 May 2014

Windham Fabrics Quilt Market Mini-Quilt Challenge! Whoa I Won the Challenge.

UPDATED POST MAY 26, 2014

I'm so excited to have heard that I won the Challenge. I was so surprised as I was up against such great quilts.


I like to challenge myself when sewing, by making up as you go purses instead of using a pattern.  I also like to go outside my box with quilting.  So when I saw that the first 18 people to comments on Windham Fabrics blog one day would get a chance to design a Mini-Quilt. A best in the show quilt will be chosen from the displayed Mini-Quilts the winner will get to choose a 1/2 yard bundle of their favourite fabric from the new Windham Fabric Spring offering. 

My Mini Quilt none the less that would be displayed in their booth at International Quilt Market, Pittsburgh.  I knew it was the challenge for me, OK so after I sent in my comment then I started stressing that it wasn't the challenge for me that it would be too much outside my comfort zone. I became even more so when I got the email from Nell that said I was in.

Of  course the stress didn't go away when I opened up the fabric pack and saw what fabric I had.  I saw  Bake by Julia Rothman. Don't get me wrong, I love the fabric I can see myself making some things from it, but I couldn't see a clear design at first as the patterns them selves are large for such a small quilt, as it was only 18"x18".


My first idea didn't turn out at all as the pattern was too busy, for the design I was trying to do. I kept working on it of course that meant that I was running out of time and fabric.  I made it though,  not my best work ever, but the main thing is I'm happy with the results and I diffidently made myself jump outside my comfort zone.


 I used the Knife Edge Binding to finish my mini as the other prints were just too big. I like the look of the knife edge as it doesn't detracted from the front of the quilt.


I wish I could be there to see it hanging in the booth.  Hopefully  we will see some pictures being posted of all our great mini quilts displayed in the Windham Fabric booth.

I'm very Happy to have been given the chance to do this contest.  

Also of course now that I have seen all the new Windham Fabric, I might have to go shopping......Who am I kidding I will have to go shopping.


Monday, 3 February 2014

Bag of the Month Club Feburary............Butterfly Sling Purse.

I am so excited I got to pattern test Emmaline's The Butterfly Sling Purse pattern before it was released for the February Bag of the Month. I had so much fun with this. I love Janelle's patterns they are very well written and her pictures, that help to explain the steps in the pattern, are very clear. When you buy one of Janelle's patterns you know that the finished product will look like the picture on the front of the pattern. (I think I nailed it.) lol


I always read the pattern before I start, and was happy to see that I had all the supplies on hand. Of course, Janelle has all the hardware in her shop http://www.emmalinebags.com  if you are not able to pick up the supplies locally. Hence, why I need to place an order for the heart shape lock.....Love it.


The hardest part for me with any patten is deciding on fabric. I seem to have a large stash of it in my sewing room. (big large stashes of fabric....there I feel better because I have admitted it.)  I have had this decor fabric for awhile as I wanted to make a clutch with it.  Soon as I read the pattern I knew it would be perfect for the Butterfly Sling.  I used Pellon TP971F Fusible Fleece Thermolam Plus and Pellon 911FF Fusible Featherweight that Janelle suggested in the pattern. Also I found my decorative zippers with great zipper pulls on them.

It is decor fabric that's the same weight as quilting cotton.  The only thing to watch for with some decor fabrics, is that the fabric shrinks when fusing on your interfacing or fusible fleece.  I ran into problems with the closure strap, as it is a little tighter than I wanted when closed.   As long as you are aware of your fabric content, you shouldn't run into any problems when fusing your interfacing and causing your fabric to shrink. Some people fuse their interfacing on before they cut out their pattern pieces, this can help insure your pattern stays true to size.


I wasn't sure if I would like the clear plastic pocket on this purse, as I always find that your I.D. sticks to the plastic and is hard to remove.  The I.D. pocket is generous in this purse, so I have not had any problems with getting my I.D. out of it.  It has a phone pocket as well, which is handy. Not having to dig through your purse is a bonus.  I find there are enough slots for all my cards, as we all seem to have tons of them. Also, there is a place to put my change, even though we no longer have pennies in Canada we do have toonies and loonies that need a place to pile up.

I didn't run into any problems making the purse other that the shrinkage of the fabric.  I find it is comfortable to wear and a good size to take out and about.  I'm sure I will have to make up a few more of these.   Of course, with most of the bags I make up now I have to add a little jewellery to add the bling.  Emmaline has a great selection.


Wednesday, 25 September 2013

The Sewing Summit.........the days passed quickly.


The Sewing Summit went by quickly.  A lot was crammed in during the time I was there.


I flew in on Tuesday so I had extra time to spend on Wednesday, I decided to go find a fabric store.  I posted on the Summit Facebook page that I wanted to go to a store but they seemed to be too far away.  A couple of ladies recommended Tissu Fine Fabric  http://www.tissufabrics.com
it was worth the short walk from the hotel. The shop was stocked with so many different types of fabric to chose from. I was able to get some fabric for my metal clutch purse. Hopefully some of you were able to visit her store on the Friday and Saturday to take advance of the Sale.

I had so much fun - learned lots, laughed lots and ate lots. The time seemed to fly by I enjoyed the lectures I took as well as the hands-on classes I had.  I think I had a good balance between the lectures and hands-on classes.  I left the lectures with some new motivation to work on my blog, which I  hope to do over the next few weeks.  Also, with an interest in getting back to finishing some of the patterns I have been puttering on.

It was great to have so many ladies in one place all interested in forms of sewing whether it be quilting, sewing clothes, or bag making.  It was fun seeing a lot of great sewing going on in the sewing rooms after hours and also they amount of new bags and clothes that were made to use during the Summit.

I now have a lot of new friends interested in the same things I am, as well as a lot of new to me exciting websites to go to.

The hotel was great and is amazing how many conferences and meetings that they can put on at once. I also enjoyed that we were able to walk to the Temple Gardens and walk around in such  beautiful flower gardens. 


I had such a great time, I would love to go again sometime.  It was so great to make it to the Summit after following the posts about it for the first two years.


But the big question is did I buy more fabric on the Shop Hop or Marshmallows from Walmart?
Needless to say I didn't have to pay extra for too much weight in my suitcase. In fact the guy at the airport looked at my suitcase and said it didn't look over 50lbs so he never even weight it.


Monday, 16 September 2013

Sewing Summit...it's getting closer.

Well one sleep left and I'm on the plane to the Summit.  Can't wait, I made it to the hotel in Ottawa.I think it was a good choice, lots of construction on the 401 and 416 I believe it was 6 constructions sites we passed that had the Hwy down to one lane.  Of course the off ramp we wanted to take was closed to.  So glad I'm here already and only a 5 min drive tomorrow.  We would have been pushing it to make it on time tomorrow morning.

Look I pack light so I have room to bring stuff back with me. My carry on will have my lap top, the cords, camera and kobo.


I will try post during the Summit.


Sunday, 8 September 2013

Leather Messenger Bag......Sewing Summit here I come.


This is my Leather Messenger Bag,  I wanted something that I could carry my laptop in and also use to carry just about anything else in.  I have used distressed cow leather in a burgundy colour.  I wanted something that would stand up to years of use but not something that I worry about it getting marked up.


This is my own pattern that I designed as I went along to be able to add everything that I wanted in it.
I have a pocket that the computer slides into that I have added a leather strap that holds it closed so my laptop stay in place.  I have a large zippered pocket, that stays flat until you place things in it and then it expands as it is pleated at the bottom. I have also added a leather strap and toggle hook to hold my keys so they don't end up at the bottom of the bag. I used a fusible fleece attached to the lining and added horse hair interfacing, it is free floating from the top of the lining front to back to help the lining not stretch too much when the bag is fully loaded. If I make myself or anyone one I will go looking for a heavy fusible Pellon  interfacing.  I have a hard time finding it in my area.


As I want to use this bag when I travel to The Sewing Summit in Salt Lake City, Utah in about a week, I wanted to add the Canadian Maple Leaf to the bag.  I didn't want to add a badge or pin to it of the Canadian Flag. I drew an outline of a Maple Leaf on paper and then used the pattern to sew around the pattern.  It is nerve racking to make sure you stay on the line and I would suggest checking your bobbin to make sure that you have enough bobbin thread.  (I did do the bobbin check.)
I suggest when sewing with leather to check your bobbin regularly.  Back stitching on leather while top stitching never looks right.  I always tie off my ends instead of back stitching while top stitching taking the extra time produces a more professional look.


Now to add a little bling to the bag by adding purse jewellery. I was able to try Janelle's new "handmade" hardware.  Janelle from Emmaline will have these in her shop soon. She also came up with a zipper flog that says handmade as well. I'm in love with this purse jewellery,  I can see me adding these to more items in the future. I think these take your bags to a whole new level, maybe even making people think that it is a name brand.  I didn't want to take away from the Maple Leaf or the handmade hardware, so I used magnetic snaps as the closures for the bag.

Well I'm now Traveling Handmade for the Sewing Summit, I can't wait.


The Sewing Summit